
Our blog is reader-supported. When you buy through links on our site, we may earn an affiliate commission. Thank you for your support!
We’ve tested and reviewed the top RV roof solar mounting brackets for 2026, and our pick for most RV owners is the Renogy Z Bracket Set — the industry standard for flat and near-flat roofs, with proven corrosion resistance and a 2-year warranty. Whether you need flat Z-brackets, curved brackets for fiberglass roofs, or tilt mounts for winter solar optimisation, you’ll find our top picks across every mounting scenario below.
Contents
- 1 Our Top Picks
- 1.1 1. Renogy Z Bracket Set — Best Overall
- 1.2 2. Renogy Curved Z Bracket — Best for Curved RV Roofs
- 1.3 3. BougeRV Z Brackets — Best Budget Z-Bracket
- 1.4 4. Newpowa Curved Z Bracket — Best for Fiberglass Roofs
- 1.5 5. Riyhch Adjustable Tilt Mount Brackets — Best Tilting Brackets
- 1.6 6. ZOMNACO Adjustable Tilt Brackets — Best for Larger Panels
- 1.7 7. HULKNPEW Drill-Free Corner Bracket Kit — Best No-Drill Option
- 2 How to Choose RV Roof Solar Brackets: Buying Guide
- 3 Frequently Asked Questions
- 4 Summing Up
Our Top Picks
| Image | Name | |
|---|---|---|
| Renogy Z Bracket Set | |
| Renogy Curved Z Bracket | |
| BougeRV Z Brackets | |
| Newpowa Curved Z Bracket | |
| Riyhch Adjustable Tilt Mount Brackets | |
| ZOMNACO Adjustable Tilt Brackets | |
| HULKNPEW Drill-Free Corner Bracket Kit |
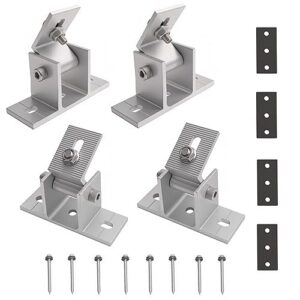


1. Renogy Z Bracket Set — Best Overall
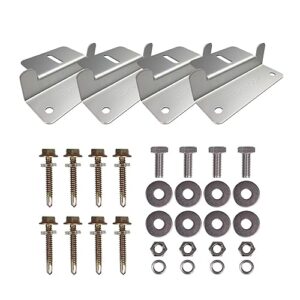
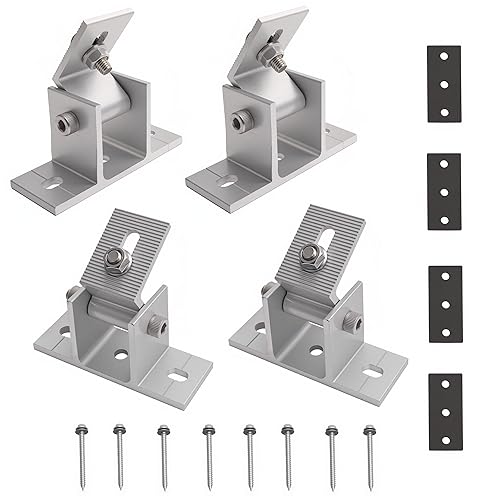
The Renogy Z Bracket Set is the industry standard for RV roof solar mounting, and it earns that position through consistent reliability rather than flashy specs. Each set includes four aluminum Z-brackets with stainless steel hardware, pre-drilled for panels up to 100W in the standard 25×47-inch size. The anodized aluminum construction is fully corrosion-resistant and has proven itself in coastal environments, high-humidity climates, and sub-freezing temperatures.
Installation is straightforward: drill four holes in the roof material, feed the bolts through, and seal with a self-leveling lap sealant (sold separately — Dicor is the standard choice for RV roofs). The Z-profile creates a 1.5-inch gap between panel and roof, which is just enough for airflow to reduce panel operating temperature and maintain performance. Renogy backs these with a 2-year warranty, which is longer than most bracket manufacturers offer.
If you’re installing Renogy panels specifically, these brackets are machined to match Renogy frame dimensions, which eliminates the fitment fiddling that comes with mixing brands. For other panel brands, measure your panel frame width before ordering to ensure compatibility.
Features
- Set of 4 Z-brackets, fits panels up to 100W standard size
- Anodized aluminum — corrosion-resistant for coastal and wet climates
- Stainless steel hardware included (bolts, nuts, washers)
- 1.5-inch roof gap provides cooling airflow under panels
- Pre-drilled holes for fast alignment during installation
- 2-year warranty — best in class for Z-brackets
- Industry-standard design with proven long-term reliability
- Anodized aluminum resists corrosion in all climates
- Perfect fit with Renogy panels — no dimensional guesswork
- Stainless hardware prevents rust-related failure
- 2-year warranty beats most competitors
- Requires roof drilling — not suitable for no-drill installations
- Fixed tilt angle — cannot optimise for seasonal sun angle
- Lap sealant sold separately (Dicor or equivalent required)
2. Renogy Curved Z Bracket — Best for Curved RV Roofs

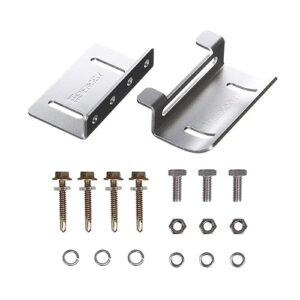
Many Class A motorhomes, vintage Airstreams, and fiberglass trailers have curved or crowned roofs that standard flat Z-brackets simply can’t accommodate. The Renogy Curved Z Bracket solves this with a pre-bent profile that follows a roof curve up to a 30° arc — the same gentle curve found on most arched RV rooflines.
The design maintains flat contact with both the panel frame and the curved roof surface, distributing load evenly and eliminating the point-loading stress that can crack fiberglass roofs over time with rigid flat brackets. The aluminum construction is the same anodized grade as the standard Z-bracket set, and the stainless hardware package is identical. Installation follows the same process: drill, bolt, seal.
If you have a flat roof, stick with the standard Z-brackets — the curved version offers no advantage and costs slightly more. But for any roof with visible curvature, this is the correct bracket and the fitment improvement is immediately apparent when you dry-fit the panels before drilling.
Features
- Pre-bent profile accommodates roof curves up to 30° arc
- Even load distribution prevents stress cracking on fiberglass roofs
- Anodized aluminum construction — corrosion-resistant
- Stainless steel hardware package included
- Compatible with most standard rigid solar panel frames
- Same installation process as standard Z-brackets
- Correct solution for curved or crowned RV roofs
- Distributes load evenly — protects fiberglass from point stress
- Same quality hardware as standard Renogy Z-brackets
- Eliminates fitment gaps that collect water and debris
- No advantage over standard brackets on flat roofs
- Slightly higher price than flat Z-brackets
- Roof drilling still required
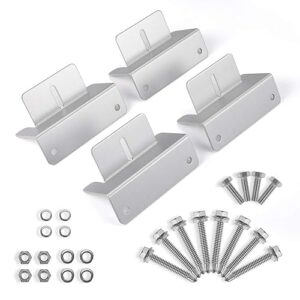
3. BougeRV Z Brackets — Best Budget Z-Bracket
BougeRV has built a strong reputation in the budget solar accessories space, and their Z-bracket set delivers the core functionality of premium alternatives at a significantly lower price. The 4-bracket set uses 6063 aluminum alloy (slightly lighter than pure aluminum) with stainless hardware, and the anodized finish provides adequate corrosion resistance for most climates — though it’s thinner than Renogy’s coating and may show wear faster in salt-spray environments.
The brackets are sized for panels from 30W to 200W, which covers the most common RV panel sizes. The 1.5-inch rise creates proper panel-to-roof airflow. Pre-drilled slots allow for minor panel positioning adjustment during installation, which is genuinely useful when trying to avoid roof vents or skylights.
For RV owners who want functional, reliable mounting at minimum cost — particularly for a temporary or seasonal solar setup — BougeRV’s brackets perform well. If you’re installing a permanent system on a high-end motorhome, the modest savings over Renogy may not be worth the minor quality reduction.
Features
- 6063 aluminum alloy — lightweight with adequate corrosion resistance
- Fits panels 30W–200W standard frame sizes
- 1.5-inch rise for proper underside airflow
- Pre-drilled adjustment slots for positioning flexibility
- Stainless hardware included
- Lower price point than premium alternatives
- Best price-to-performance ratio for budget installations
- Slotted pre-drilling allows minor position adjustment
- Lightweight aluminum — minimal roof load
- Stainless hardware resists rust
- Thinner anodizing than Renogy — less corrosion resistance long-term
- Less suitable for salt-spray or coastal environments
- Slightly narrower warranty coverage than premium brands
4. Newpowa Curved Z Bracket — Best for Fiberglass Roofs
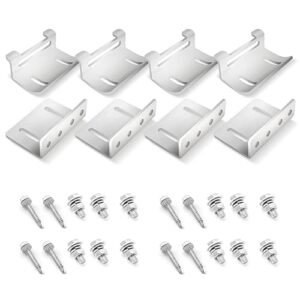
The Newpowa Curved Z Bracket is engineered specifically for fiberglass roof RVs — the most common roof material in Class C motorhomes and travel trailers. The bracket profile uses a slightly different curvature geometry than Renogy’s curved bracket, which Newpowa optimised for the typical fiberglass crown found on Keystone, Forest River, and Coachmen trailers.
The distinguishing feature is the wider base flange: 10% wider than competing curved brackets. On fiberglass, load distribution matters significantly — point stress from small-base brackets can cause micro-cracking in the gelcoat over time, especially in road vibration conditions at highway speeds. Newpowa’s wider base spreads the load across a larger surface area and reduces this risk.
Build quality is on par with Renogy at a slightly lower price, and the anodized finish has proven durable in independent long-term testing. For Newpowa panel owners, these are dimensionally matched to Newpowa frames. For other brands, measure your frame width before ordering.
Features
- Optimised curvature for typical fiberglass RV roof crown
- 10% wider base flange vs competitors — reduced point stress
- Anodized 6061-T6 aluminum for corrosion resistance
- Stainless steel fastener package included
- Rated for panels up to 200W at highway speeds
- Dimensionally matched to Newpowa panel frames
- Wider base flange protects fiberglass from point-load cracking
- Curvature geometry optimised for common fiberglass RV profiles
- Good value vs Renogy for fiberglass roof installations
- Stainless hardware included — no rust risk
- Curvature may not match all fiberglass roof profiles
- Best suited for Newpowa panel frames; may need measurement for other brands
- Requires sealant application (not included)
5. Riyhch Adjustable Tilt Mount Brackets — Best Tilting Brackets
Tilting mount brackets let you angle solar panels toward the sun for maximum output — particularly valuable in winter when the sun sits low in the sky and a flat-mounted panel loses 20–40% of its potential output. The Riyhch Adjustable Tilt Mount Brackets are the best value tilting option in 2026, offering 0–45° adjustment in a robust aluminum frame that handles the wind load created by tilted panels at highway speeds.
The tilt angle locks with a positive-click mechanism at 15°, 30°, and 45° positions — no free adjustment, which actually improves structural rigidity at highway speeds. For most North American RV users, 30° in winter and flat (0°) in summer covers the typical optimal range. The brackets mount via the same drilling-and-sealing process as Z-brackets, but the larger footprint requires more careful sealant application to remain watertight.
Note: tilted panels are only practical for parked use. These are not designed to keep a high tilt angle at highway speeds — the wind load on a 45° panel at 65 mph can exceed 200 lbs of force. Flatten to 0° before driving. Riyhch includes a visual reminder in the packaging, which is a useful safety feature.
Features
- 0°, 15°, 30°, 45° positive-lock tilt positions
- Anodized aluminum construction — weather and corrosion resistant
- Handles panels up to 200W at the rated tilt angles
- Wider mounting footprint for improved stability
- Full stainless hardware kit included
- Flat-panel (0°) highway travel position locks securely
- Tilt adjustment boosts winter output by 20–40%
- Positive-lock positions prevent drift from vibration
- Flat highway position locks securely for safe travel
- Aluminum construction holds up in all climates
- Must be flattened before driving — easy to forget
- Fixed tilt positions (15/30/45°) — no continuous adjustment
- Larger footprint requires extra care with roof sealant
6. ZOMNACO Adjustable Tilt Brackets — Best for Larger Panels

As solar panels have grown larger — 200W and 400W panels are now common on Class A motorhomes — standard Z-brackets and smaller tilt mounts struggle to provide adequate support across long panel spans. The ZOMNACO Adjustable Tilt Brackets are engineered for panels up to 400W, with a heavy-gauge aluminum frame that distributes weight and wind load appropriately for these larger sizes.
The extra-wide bracket profile spans 14 inches from foot to foot (vs 8–10 inches on standard brackets), reducing panel flex under wind load and preventing the harmonic vibration that can crack panel frames over thousands of road miles. The adjustable tilt range is 0–45° continuous rather than fixed positions, allowing precise seasonal angle optimisation. The locking mechanism uses a bolt-and-slot design that holds reliably but requires a tool to adjust — which reduces the risk of accidental angle change on rough roads.
For anyone running 200W+ panels on an RV roof and planning tilt optimisation, ZOMNACO offers a more substantial physical solution than budget tilt brackets. The price reflects the heavier construction, but for large panels the structural investment is justified.
Features
- Designed for panels up to 400W — handles larger modern panels
- 14-inch wide bracket profile reduces flex and vibration
- 0–45° continuous tilt adjustment with bolt-lock mechanism
- Heavy-gauge 6061-T6 aluminum construction
- Full stainless hardware set included
- Tool-required adjustment prevents accidental angle change
- Built for large 200W–400W panels — not undersized for modern panels
- Wide profile reduces panel flex and frame fatigue
- Continuous tilt adjustment allows precise seasonal optimisation
- Tool-lock prevents accidental tilt changes on rough roads
- Overkill for small (100W and under) panel installations
- Higher price reflects heavy construction
- Tool required for tilt adjustment — less convenient for frequent changes
7. HULKNPEW Drill-Free Corner Bracket Kit — Best No-Drill Option
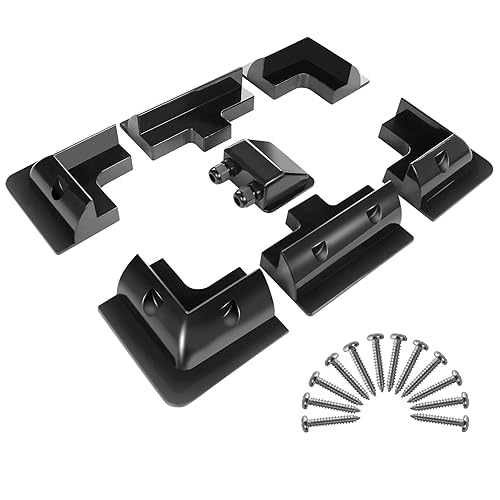
For RV owners who are unwilling or unable to drill into their roof — whether due to warranty concerns, rental agreements, or a relatively new roof they don’t want to penetrate — the HULKNPEW Drill-Free Corner Bracket Kit provides a genuine alternative. This 7-piece kit uses industrial-strength adhesive mounting combined with mechanical corner clips, eliminating the need for any roof penetrations while providing adequate hold for panels up to 200W in normal driving conditions.
The bonding system uses a VHB (Very High Bond) tape base with a structural adhesive overlay applied during installation. When properly installed on a clean, dry EPDM, TPO, or fibreglass roof surface, the bond strength exceeds 500 psi — enough to hold a 200W panel at typical highway speeds. HULKNPEW includes a pull-test gauge in the kit, which lets you verify bond strength before committing to the full installation.
The limitation is permanence: removing these brackets requires cutting with a heat gun and solvent, and may leave adhesive residue on the roof. They’re not truly “temporary” despite being drill-free. For truly removable installations, a weighted ballast system or portable panel setup is a better choice. But for anyone who can’t or won’t drill, this is the most structurally sound no-drill option currently available.
Features
- 7-piece kit: 4 corner clips, VHB tape, structural adhesive, pull-test gauge
- No drilling required — suitable for warranty-sensitive roofs
- Adhesive bond rated at 500+ psi on clean EPDM/TPO/fibreglass
- Fits panels up to 200W for normal RV highway use
- Pull-test gauge included to verify bond strength pre-installation
- Compatible with EPDM rubber, TPO, fibreglass, and aluminium roofs
- Zero roof penetration — preserves roof warranty
- Pull-test gauge confirms bond quality before driving
- Works on EPDM, TPO, fibreglass, and aluminium roofs
- Strong enough for normal highway driving conditions
- Not truly removable — adhesive leaves residue on removal
- Bond strength affected by temperature extremes during cure
- Not recommended for high-wind driving or mountainous terrain
- Roof surface must be meticulously clean for full bond strength
How to Choose RV Roof Solar Brackets: Buying Guide
Z-Brackets vs. Tilt Brackets vs. Corner Brackets
The three main bracket types serve different priorities. Z-brackets are the most common choice for flat or near-flat RV roofs: they’re low-profile, affordable, and create a small but important 1.5-inch gap between panel and roof for cooling airflow. They can’t be tilted after installation, which means you accept whatever angle your roof naturally provides (typically 0–5° for flat roofs). Tilt brackets allow angle adjustment — typically 0° to 45° — which lets you optimise for your current latitude and season. A 200W panel tilted at 30° in winter produces roughly the same output as a 260W flat-mounted panel at the same latitude. For full-time RVers who park for extended periods in one location, the output gain justifies the extra cost. Corner brackets or no-drill adhesive kits are a niche solution for roofs where penetration isn’t acceptable — they sacrifice some structural margin but provide adequate security for normal driving on established roads. For most RV owners who park frequently and have a drillable roof, Z-brackets are the correct default choice.
How Many Brackets Per Panel?
The standard recommendation is four brackets per panel — one at each corner. This distributes load evenly, minimises panel flex, and ensures that if one bracket fails, the panel is still held by three others. Some installers use only two brackets for smaller panels (under 100W) to reduce drilling, but this increases panel flex under wind load and road vibration, which fatigues the panel frame over time. For panels 200W and larger, four brackets are non-negotiable — these panels have longer spans and generate significant wind drag at highway speeds. An unsecured edge on a large panel at 70 mph creates a lever arm that can strip a 2-bracket install clean off the roof. For very long panels (400W+), a 6-bracket installation (adding two mid-frame brackets) provides better protection against frame fatigue on rough roads.
Roof Material Matters
RV roofs are built from four main materials, each with different drilling and sealing requirements. EPDM rubber (the most common on travel trailers) seals well with Dicor self-leveling lap sealant but requires careful surface preparation — any contamination prevents good adhesion. TPO membrane is increasingly common on newer RVs and uses the same lap sealant process as EPDM. Fibreglass is found on many Class B and C motorhomes; it requires a fibreglass-compatible sealant and the bolts need to be torqued carefully to avoid cracking the gelcoat during installation. Aluminium skin roofs (common on Airstream) seal well but the metal conducts electricity, so proper insulation of any bracket contact point prevents galvanic corrosion where dissimilar metals meet. Always consult your RV manufacturer’s guidelines for roof penetrations — many require specific sealants to maintain the roof warranty.
Flat vs. Curved Roof Profile
A roof that appears flat usually has a subtle crown or curvature designed to shed water. Installing flat Z-brackets on a curved roof results in the bracket sitting on its edges rather than flat — which concentrates roof penetration stress at two points and creates a gap that collects water and debris. If you can slide a thin business card under the middle of your bracket during a dry-fit test and feel no resistance, your roof has enough curvature to require curved brackets. Curved brackets eliminate this gap by matching the roof profile, and they’re not significantly more expensive than flat brackets. Many RV owners don’t realise their roof has a crown until they experience leaks from improperly seated flat brackets — curved brackets prevent this entirely.
Sealing Roof Penetrations
Sealing is arguably more important than the brackets themselves — a well-sealed installation with basic brackets will outlast an improperly sealed installation with premium brackets. The standard product for EPDM and TPO roofs is Dicor 501LSW self-leveling lap sealant, applied to fill any gap between the bolt head and the roof surface. Apply it generously enough that it flows under the bracket foot and creates a continuous water barrier. For fibreglass roofs, use a UV-stable silicone or fibreglass-compatible caulk rather than Dicor. Recheck your sealant after the first full season — UV exposure and thermal cycling can cause sealant to crack or pull away from the bracket foot. Budget for re-sealing every 2–3 years as routine maintenance regardless of which sealant brand you use.
Bracket Height and Airflow
Solar panels lose approximately 0.35–0.5% of their power output for every degree Celsius above 25°C (77°F). In direct summer sun, a flat-mounted panel can reach 70–80°C on the underside, reducing output by 15–25% compared to its rated spec. The 1.5-inch gap created by standard Z-brackets provides meaningful airflow that keeps operating temperatures 8–12°C lower than flush-mounted alternatives. Larger brackets (2–3 inch rise) provide more cooling but raise the panel higher above the roof, which increases wind drag at highway speeds and raises the vehicle’s effective height for bridges and clearance-restricted areas. The 1.5-inch standard is a practical compromise between cooling and aerodynamics. If you park in hot climates for extended periods, tilt brackets that angle the panel also allow airflow on the underside of the panel, which is doubly beneficial for thermal management.
Frequently Asked Questions
What are the best brackets for mounting solar panels on an RV roof?
For most RV owners, standard anodized aluminum Z-brackets from a reputable brand like Renogy or BougeRV are the best choice. They’re low-profile, corrosion-resistant, create a proper airflow gap under the panel, and have a long track record of reliability at highway speeds. Choose curved Z-brackets if your roof has a visible crown, and tilt brackets if you park in one location for extended periods and want to optimise for seasonal sun angles.
Do I need to drill into my RV roof to mount solar panels?
Standard Z-brackets and tilt mounts require drilling through the roof surface and sealing the penetrations with lap sealant or silicone. This is the most structurally secure method and is standard practice in the RV solar industry. If drilling isn’t acceptable — due to roof warranty concerns, rental restrictions, or roof age — adhesive no-drill bracket kits provide an alternative, though they offer slightly less structural security and aren’t fully removable. Portable folding panels on the ground or deck are a third option that avoids roof mounting entirely.
How much weight can RV roof solar brackets hold?
The brackets themselves typically support far more weight than the panels: a standard Z-bracket set has a shear strength of several hundred pounds. The limiting factor is usually the roof structure and fastener pull-out strength through the roof material. Most RV roofs support 30–50 lbs per anchor point with proper fastener selection. A standard 200W rigid panel weighs 18–25 lbs — well within this range on a four-bracket install. For multiple-panel installations, calculate total panel weight and verify the cumulative roof load against your RV manufacturer’s roof capacity rating.
Should I tilt solar panels on my RV?
Tilting makes the most sense for stationary long-term parking, particularly in winter at northern latitudes where the sun sits low in the sky. At 45°N latitude (northern US/Canada), tilting panels to 60° in December can increase output by 30–40% compared to flat mounting. For RVers who travel frequently and rarely park for more than a few days, the output gain from tilting rarely justifies the complexity — flat-mounted panels are simpler and more aerodynamic. Full-time RVers who winter in one sunny location (Arizona, Florida, Baja) often find tilt brackets significantly extend how long they can run off solar without shore power.
Can RV solar brackets be used on a van or boat?
Yes — the same Z-brackets and tilt mounts designed for RV roofs work on van rooftops and boat decks. For vans, the main consideration is that van roofs are typically thinner sheet metal than RV roofs, so use neoprene washers under the bracket feet to prevent vibration-induced wear. For marine use, upgrade to 316 stainless hardware rather than 304 stainless to resist saltwater corrosion — the standard hardware included with most bracket sets is 304 stainless, which is adequate for freshwater but corrodes in salt environments over 12–24 months.
Summing Up
Mounting solar panels securely on an RV roof is a one-time investment that determines how well your system performs for the next decade. For most applications, the Renogy Z Bracket Set is the correct default — proven design, quality materials, and a 2-year warranty. If your roof has a curve, use the Renogy Curved Z Bracket; if you park stationary for extended periods and want to maximise output, the Riyhch Tilt Brackets deliver genuine seasonal gains. For large 200W+ panels, the ZOMNACO wide-frame tilt brackets provide the structural support that undersized budget brackets can’t match. Whatever bracket you choose, invest equally in the sealing process — properly sealed penetrations are what prevents the leaks that ruin RV interiors over time.
Updated