Cooking delicious food on a hot sunny day is always a great idea. However, it’s even better to use a solar oven for cooking food. Why? Well, you wouldn’t want to waste the abundant energy from direct sunlight, do you?
If you want to save some bucks and cook food, there’s no need to buy a branded solar product. With cardboard, tape, and other domestic materials, you can build your DIY solar oven! The most vital part is to use some science and follow our steps.
You can build a homemade solar oven without any hassle. So, without any further ado, let us understand how to make a solar oven from basic household material.
Contents
- 1 How to Build a Solar Oven From Scratch
- 2 DIY Solar Oven Materials
- 3 How to Make a Solar Oven With Ease
- 4 Time For Cooking
- 5 The Science Behind a DIY Solar Oven
- 6 How to Make A Heavy Duty Solar Oven
- 7 What to Cook With A Homemade Solar Oven
- 8 The Solar Cooker Market
- 9 Expert Insights From Our Solar Panel Installers About DIY Solar Ovens
- 10 Wrapping Up
- 11 Frequently Asked Questions
- 12 Summing Up
How to Build a Solar Oven From Scratch
You can use a cardboard box to construct an efficient and inexpensive solar oven. Just gather the right material and use solar power to work its magic!
DIY Solar Oven Materials
First things first — to build a solar oven, gather these domestic materials:
- Cardboard box
- Aluminum Foil
- Plastic Wrap
- Black construction paper
- Duct tape
- Ruler
- Thermometer
- Glue
- Cutter or scissors
- Newspaper rolls
Once you have all the above materials, it’s time to get creative.
How to Make a Solar Oven With Ease
A couple of steps, and you can become the master of the DIY solar oven product. It is advisable to follow safety precautions before working on the project.
Step 1: Work on the Cardboard Box
 First and foremost, you need to cut the cardboard box properly. Ensure the box is clean to use. Begin by drawing a square from the top of the box.
Note that you need to leave a one-inch space from the edges. Now, using a scissor, cut three sides of the square box. Ensure the fourth side works like a flap to open the cardboard cutout.
Step 2: Time to Use the Aluminum Foil
The next step is to cover the inner side of the cardboard opening. You can wrap the aluminum foil tightly. Further, with the help of tape, paste this foil firmly inside the box.
Aluminum works as a reflective material that keeps the sun rays concentrated inside the box. Hence, to make a solar oven efficient, such foil is mandatory.
Furthermore, repeat the same procedure for each solar oven flap. The trick is to help maintain the temperature of the interior of your DIY solar oven.
Step 3: Use Black Construction Paper
It’s vital to cover the bottom of your solar oven box with black paper. You can use duct tape for this purpose. This step is crucial for insulation purposes. Moreover, insulated solar electric cooking reduces the power demand for heating edibles.
This black paper absorbs solar energy and is paramount in capturing more heat. Hence, your cooking needs will meet adequate energy.
Step 4: Make an Airtight Window
It’s time to use the plastic wrap. You can cover the solar oven opening with transparent plastic wrap. Solar ovens need an airtight opening to trap the warm air inside the box.
If you find it difficult to tape the transparent plastic on the opening, use a cardboard frame. You can measure the dimensions of the solar oven and make a separate clear plastic lid.
Step 5: Take Care of Heat Losses
For efficient cooking, it is essential to insulate the solar cooker. You can use a newspaper to stuff the interior of the box. The trick is to keep the interior hot enough for cooking food.
The newspaper rolls carry out the insulation task. Hence, tape them to the inner sides firmly. However, be sure to leave enough space for a pan to fit in the solar cooker.
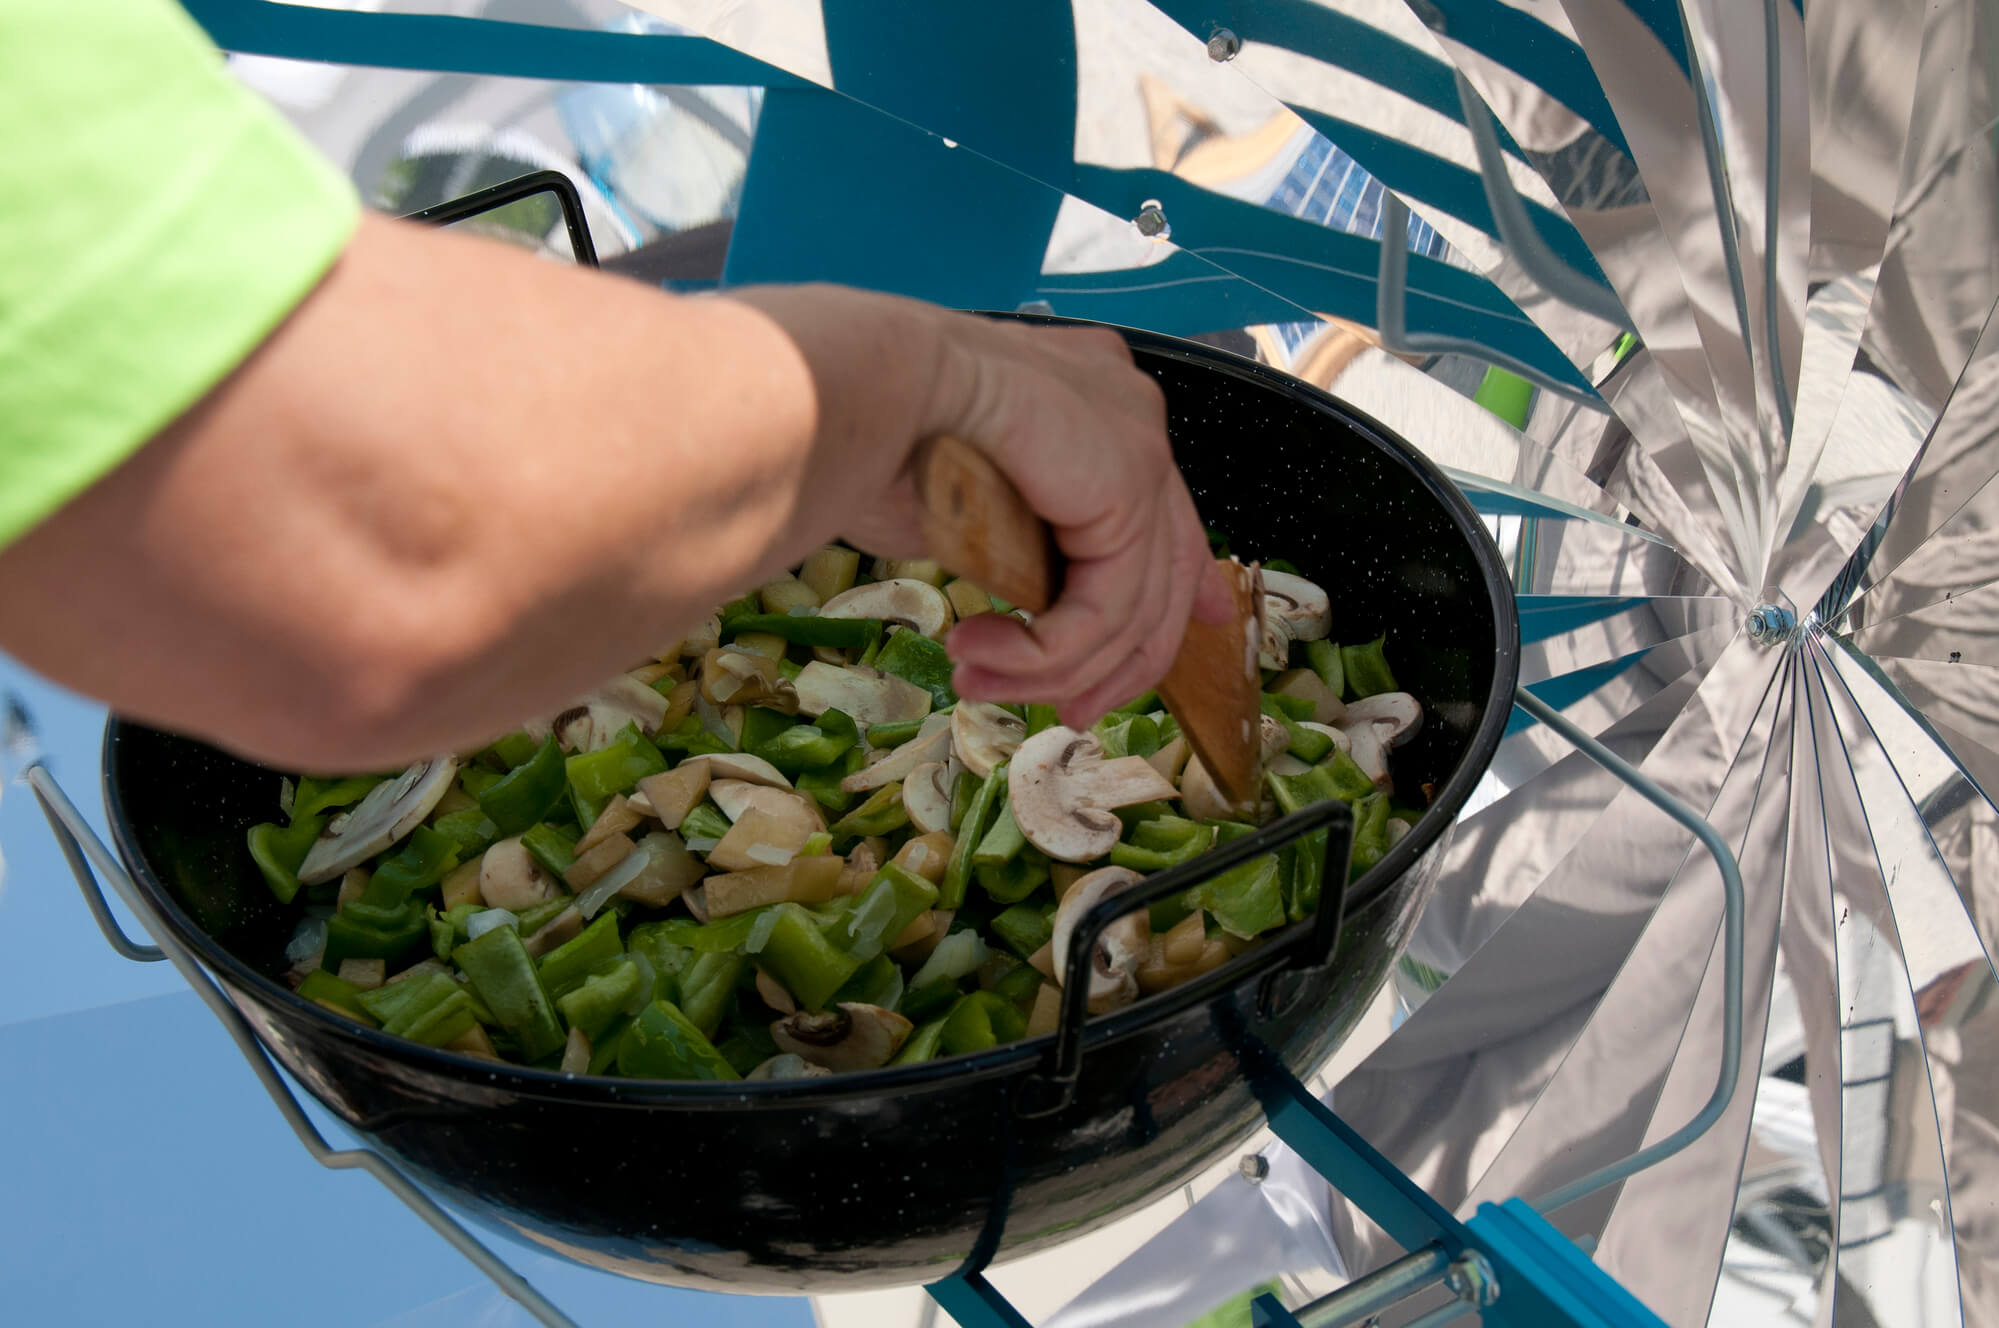
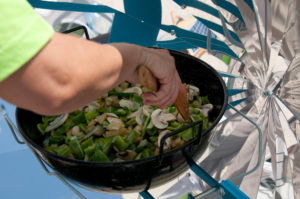
Time For Cooking
Now, your solar oven is ready to function. Importantly, by following the above five steps, you can make a solar oven in the least possible duration.
It’s time to use your DIY solar oven scientifically. Solar ovens need the right temperature for cooking. Importantly, you need to place the oven under strong sunlight.
Hence, timing is crucial to avoid the slow cook phenomenon. Most users cook in a solar oven between 11:00 a.m. and 03:00 p.m. This period generally enjoys a hot sun to heat the inner surface. Also, ensure your opening lid is at a good angle to receive maximum sun rays.
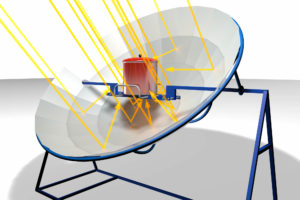
The Science Behind a DIY Solar Oven
 It is useful to understand the working principle of the device you just made. After all, solar ovens work entirely on science.
Here is the chronology of the solar energy and consequent cooking process.
- The heat from sun rays enters the box through the transparent plastic wrap opening.
- Due to the flaps and aluminum materials, the rays get focused in the cooking area.
- The air trapped inside heats up due to sunlight.
- Now, you might remember the existence of black construction paper. This paper absorbs maximum heat towards the bottom of the solar oven.
- In addition, the newspaper tubes help with ineffective insulation. In simple words, the heat doesn’t escape the inside of your solar oven.
- This heat cooks the food kept on a plate within the box. On sunny days, the temperature can cross 150 degrees Fahrenheit.
- Thus, your solar oven is ready for food to cook on a hot day.
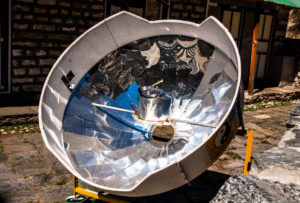
How to Make A Heavy Duty Solar Oven
The above procedure is universal to make a solar oven. However, you can replace a typical pizza box with a durable solar oven by altering some materials.
For instance, you can replace the following materials explained in our above procedure:
- Cardboard with wood
- Plastic wrap with glass
However, kids may find it challenging to work with these materials. You can create sufficient insulation with black paper, aluminum foil, and newspaper tubes using a suitable wooden box.
This project is possible to create at home. These materials can even prove sufficient for a commercial DIY solar oven.
What to Cook With A Homemade Solar Oven
 You can cook any food in a homemade solar oven. Just make sure you use a plate to place the food. Some great food ideas are:
- Chocolate fondue
- Chicken fingers
- Baked potatoes
- Ready-to-eat food wraps
- Cake
The scope of cooking various food items in a solar oven is immense. You can even use a thermometer to check the food temperatures periodically.
Remember to close the sidebar while cooking. The temperatures in the box can reach high limits.
The Solar Cooker Market
With affordable manufacturing processes, thanks to science, the cost of PV cells has declined. Hence, solar cookers and ovens are finding a huge market share.
What started as a simple science project has now become a potential alternative to conventional fuel. All you need to do is prop the lid and let the sun’s heat do the trick.
Solar cookers can replace LPG, wood, and cattle waste as a renewable source for domestic cooking.
Expert Insights From Our Solar Panel Installers About DIY Solar Ovens
Building a DIY solar oven is a fantastic way to harness the sun’s energy for cooking. It’s not only eco-friendly but also a fun and educational project for the whole family.
Senior Solar Installer
One of the best parts about making a solar oven at home is that you can use readily available materials like cardboard and aluminum foil. It shows how accessible solar technology can be.
Lead Solar Technician
Understanding the science behind solar ovens, such as the role of reflective surfaces and insulation, can significantly improve the efficiency of your DIY project.
Renewable Energy Specialist
Ensuring your solar oven has proper insulation and a well-sealed cooking chamber is crucial for maintaining high temperatures and cooking food efficiently.
Solar Installation Consultant
Wrapping Up
Harnessing the sun’s energy is now an easy task. With a couple of household materials, you can make a solar oven with ease. What’s more? The cost of homemade solar cookers or ovens isn’t mind-boggling at all.
A simple box and duct tape are sufficient to get started. However, it is the science behind solar cooking that makes a huge difference. Once you get a knack for the working principle, making a solar oven is a fun task.
So, use that pizza box, glass, or plastic lying around your house. With the right procedure, you can end up saving fuel and money for the long run!
Frequently Asked Questions
What materials do you need to make a DIY solar oven?
A basic DIY solar oven requires a cardboard box, aluminum foil, a sheet of glass or clear plastic, black paint or black construction paper, and some insulating material like newspaper or foam. More advanced builds use a second nested box to create an insulating air gap. The total material cost for a functional box solar cooker is typically under $20, making it one of the most accessible DIY science and sustainability projects available.
How hot can a DIY solar oven get?
A well-built cardboard box solar oven can reach 250 to 300 degrees Fahrenheit on a clear sunny day. That’s hot enough to cook rice, beans, vegetables, and even bake bread slowly. Adding reflective flaps to concentrate more sunlight into the box can push temperatures toward 350 degrees. More advanced builds using better insulation and reflectors can approach commercial solar oven performance at a fraction of the cost.
How long does it take to cook food in a DIY solar oven?
Expect cooking times 1.5 to 2 times longer than conventional methods. Rice that takes 20 minutes on a stove might take 45 to 60 minutes in a DIY solar box cooker. Dense foods like whole potatoes or meat take longer still. The key is starting cooking at midday when the sun is highest and most direct, and re-angling the reflectors every 30 minutes or so to track the sun as it moves.
Is a DIY solar oven safe to use?
Yes, with basic precautions. Avoid looking directly at the reflected sunlight from the foil panels, as the concentrated light can temporarily damage eyesight. Use oven mitts when handling cooking pots inside the oven, since they get genuinely hot. Always use a food thermometer to verify that meat and poultry reach safe internal temperatures, just as you would with any other cooking method. Keep children supervised around the reflectors.
Can you cook meat safely in a DIY solar oven?
Yes, as long as it reaches the correct internal temperature. Chicken should reach 165 degrees Fahrenheit, ground meat 160 degrees, and whole cuts of beef or pork at least 145 degrees. Use a probe thermometer to verify, since a solar oven at 250 to 280 degrees will cook meat safely, just more slowly than a conventional oven. Low-and-slow cooking in a solar oven actually produces very tender results for many cuts.
How durable is a cardboard DIY solar oven?
Not very. A cardboard solar oven is a great learning tool and works fine for occasional use, but it’s not designed for long-term durability. Humidity, repeated heating cycles, and physical wear will degrade the box and foil over time. For a more permanent solar cooker, upgrade to a wooden box with proper weatherproof finish, metal reflectors, and tempered glass rather than plastic film for the lid. These last for years with minimal maintenance.
Summing Up
Building a DIY solar oven is a rewarding project that combines practical cooking science with real sustainability principles. You can put one together in an afternoon with basic household materials and start cooking real food from sunlight by lunchtime. The cardboard version is perfect for learning the concept, experimenting with reflector angles, and getting kids engaged with renewable energy. If you want something that lasts through multiple seasons, the same principles scale up beautifully into a proper wooden build. Either way, once you’ve cooked your first solar-powered meal, you’ll look at sunny days differently.
About the Author
Solar Panels Network USA stands at the forefront of solar energy solutions, driven by a team of seasoned solar engineers and energy consultants. With over decades of experience in delivering high-quality solar installations and maintenance, we are committed to promoting sustainable energy through customer-centric, tailored solutions. Our articles reflect this commitment, crafted collaboratively by experts to provide accurate, up-to-date insights into solar technology, ensuring our readers are well-informed and empowered in their solar energy decisions.
Updated