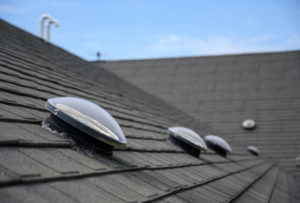
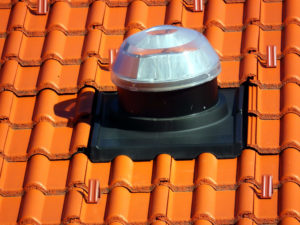
Bringing abundant natural light into interior spaces enhances aesthetics, improves energy efficiency, and creates a welcoming atmosphere. Among the various options available, installing a solar tube, also known as a tubular skylight, is a cost-effective and efficient method. This comprehensive step-by-step guide will walk you through installing a solar tube, from meticulous planning and thorough preparation to the final installation. By following these detailed instructions, you can create a well-lit and inviting space by harnessing the power of natural light.
Contents
- 1 Planning and Preparation
- 2 Installation Process
- 3 Tips and Considerations for Installation
- 4 Case Study: Bringing Natural Light into a Dark Office Space with Solar Tubes
- 5 Expert Insights From Our Solar Panel Installers About How to Install a Solar Tube
- 6 Conclusion
Planning and Preparation
Before embarking on the installation process, careful planning and thorough preparation are key to ensuring a successful solar tube installation that meets your needs and maximizes the benefits of natural light. Take the following steps to prepare yourself for a seamless installation:
Step 1: Assess Your Space and Identify Ideal Locations
Look thoroughly at your interior space and identify areas that lack sufficient natural light. A solar tube installation can greatly benefit common spaces, including bathrooms, hallways, and dark corners. Assess the availability of direct sunlight and determine the most suitable locations for your solar tubes.
Step 2: Measure and Mark the Ceiling
Once you have identified the ideal locations for your solar tubes, carefully measure and mark the corresponding spots on the ceiling. Accurate measurements and markings will ensure precise placement during the installation process.
Step 3: Understand the Components and Their Functions
To execute a successful solar tube installation, it is crucial to familiarize yourself with the various components that comprise a solar tube system. Understanding the purpose and function of each component, including the dome, reflective tube, diffuser, and flashing, will enable you to handle them effectively during the installation.

Installation Process
Step 1: Preparing the Roof and Ceiling
Proper preparation of the roof and ceiling is essential for a smooth and secure solar tube installation. Follow these detailed steps to ensure the optimal foundation for your solar tube:
Check the Attic for Obstructions
Before installing, carefully inspect the attic above the intended solar tube location. Identify any potential obstructions, such as wiring, plumbing, or insulation, that may interfere with the installation process. Make the necessary adjustments to clear the path for the solar tube.
Measure and Mark the Roof
Measure and mark the precise location where the solar tube will penetrate the roof. Accurate measurements will ensure that the solar tube aligns perfectly with the opening on the ceiling, allowing for unobstructed light transmission.
Ensure Safety when Accessing the Roof
Safety should always be a top priority during the installation process. Use sturdy ladders or scaffolding when accessing the roof, wear appropriate personal protective equipment (PPE), and take necessary precautions to prevent accidents or falls.
Step 2: Creating the Hole and Installing the Flashing
Drill the Hole in the Roof
Using a drill with the recommended hole saw size, carefully create the hole on the marked spot of the roof. Maintain precision and control while drilling to ensure a clean and accurately sized hole.
Install the Flashing for Waterproofing
Properly installing the flashing around the hole is crucial to prevent water leakage. Follow the manufacturer’s instructions to position and secure the flashing, creating a watertight seal that will protect your interior space from any potential roof leaks.
Step 3: Installing the Tube and Diffuser
Connect the Reflective Tube to the Flashing
Once the flashing is securely in place, connect the reflective tube to the opening in the flashing on the roof. Ensure a tight and secure fit to prevent any air or light leakage.
Guide the Tube Through the Ceiling Hole
Carefully guide the reflective tube through the hole in the ceiling, aligning it with the opening in the roof. Take caution not to damage the tube during this process. Ensure that the tube is straight and properly aligned for optimal light transmission.
Secure the Tube to the Ceiling
Using appropriate fixtures or screws, secure the reflective tube to the ceiling. This step ensures the tube remains stable and fixed in its designated position. Make sure to follow the manufacturer’s instructions for the specific mounting requirements of your solar tube.
Step 4: Installing the Dome and Diffuser
Attach the Dome to the Roof Flashing
Attach the dome to the roof flashing, ensuring a secure, weather-tight connection. The dome is a protective cover, shielding the tube and interior space from external elements while allowing sunlight to pass through.
Install the Diffuser on the Ceiling End of the Tube
Attach the diffuser to the end of the reflective tube on the ceiling side. The diffuser helps disperse and evenly distribute natural light throughout the room, reducing harsh shadows and creating a more pleasing and balanced illumination.
Finalize the Installation
Secure both the dome and diffuser in place, ensuring they are tightly sealed and properly attached. This step guarantees the structural integrity of the solar tube system, preventing any potential light or air leaks.

Tips and Considerations for Installation
Here are some additional tips and considerations to ensure a successful solar tube installation:
- Optimize Sunlight: Choose the ideal locations for your solar tubes where direct sunlight is readily available. This maximizes the amount of natural light that enters your space.
- Reflective Surfaces: Regularly clean the reflective tube and diffuser to ensure maximum light transmission. Any dirt or debris on these surfaces can impede the system’s efficiency.
- Proper Sealing: Apply appropriate sealants and insulation around the tube, flashing, and any connections to prevent air leaks and maintain energy efficiency.
- Safety First: During installation, prioritize your safety by using proper protective equipment, following safety guidelines, and seeking professional assistance.
Case Study: Bringing Natural Light into a Dark Office Space with Solar Tubes
Background
At Solar Panels Network USA, we are dedicated to helping our clients improve their spaces by harnessing the power of natural light. One of our recent projects involved installing solar tubes in a corporate office that struggled with insufficient natural lighting. The office, located in the heart of the city, had limited access to direct sunlight due to surrounding buildings, making artificial lighting a necessity throughout the day.
Project Overview
Our objective was to install solar tubes that would provide ample natural light to the office, reducing the need for artificial lighting and creating a more inviting and productive work environment. The project required meticulous planning and execution to ensure that the solar tubes were installed in the optimal locations for maximum light transmission.
Implementation
- Initial Assessment and Planning: We started by conducting a thorough assessment of the office space, identifying areas that would benefit most from additional natural light. Using advanced tools and techniques, we evaluated the building’s structure, roof orientation, and potential obstacles that could affect the installation.
- Design and Material Selection: Based on our assessment, we designed a customized plan for the installation of multiple solar tubes. We selected high-quality components, including reflective tubes and diffusers, to ensure efficient light transmission. The chosen locations were primarily in hallways, meeting rooms, and workstations that lacked windows.
- Installation Process
- Preparing the Roof and Ceiling: Before the installation, we ensured the attic and ceiling were free of obstructions. We then marked the precise locations for the solar tubes on both the roof and ceiling, ensuring alignment for optimal light flow. Safety measures were strictly followed, including the use of personal protective equipment and secure ladders.
- Creating the Openings and Installing Flashing: We drilled holes in the marked locations on the roof and installed the flashing to create a waterproof barrier. This step was crucial in preventing leaks and ensuring the structural integrity of the building.
- Installing the Reflective Tubes and Diffusers: The reflective tubes were connected to the flashing on the roof and carefully guided through the ceiling openings. We secured the tubes in place, ensuring they were straight and properly aligned. The diffusers were then attached to the ceiling end of the tubes, distributing the natural light evenly throughout the space.
- Finalizing the Installation: The installation was completed by attaching the domes to the roof flashing and ensuring all components were securely in place. The final inspection confirmed that the solar tubes were properly installed and functioning as expected.
Results
- Enhanced Natural Lighting: The installation of the solar tubes significantly improved the natural lighting in the office. Areas that were previously dim and reliant on artificial lighting were now bright and inviting. The enhanced natural light created a more pleasant and productive work environment, positively impacting employee morale and productivity.
- Energy Efficiency and Cost Savings: By reducing the need for artificial lighting, the office experienced a noticeable decrease in energy consumption. This not only led to cost savings on electricity bills but also contributed to the company’s sustainability goals by lowering its carbon footprint.
- Employee Feedback: Feedback from employees was overwhelmingly positive. They appreciated the improved lighting conditions, which reduced eye strain and created a more vibrant and uplifting atmosphere. The natural light also helped regulate the indoor temperature, making the office more comfortable throughout the day.
Summary
Our project to install solar tubes in a corporate office successfully transformed the space by bringing in abundant natural light. The detailed planning and precise execution ensured optimal performance of the solar tubes, resulting in enhanced lighting, energy efficiency, and improved employee satisfaction. This case study exemplifies how solar tubes can be an effective solution for brightening interior spaces and promoting a more sustainable and enjoyable work environment.
Expert Insights From Our Solar Panel Installers About How to Install a Solar Tube
Installing a solar tube is an excellent way to enhance the natural lighting in your home without significantly increasing your energy costs. It’s a straightforward process, but careful planning and precision are key to ensuring optimal performance and longevity.
Senior Solar Installer
Safety is paramount when installing a solar tube. Make sure to use proper protective gear and follow all safety guidelines, especially when working on the roof. A secure installation not only improves efficiency but also prevents potential leaks and damages.
Lead Solar Technician
Regular maintenance, such as cleaning the reflective tube and diffuser, can significantly enhance the efficiency of your solar tube. Keeping the components free of dust and debris ensures maximum light transmission and maintains the system’s overall performance.
Chief Solar Engineer
Conclusion
By installing a solar tube, you can bring abundant natural light into your interior spaces, transforming them into bright and inviting areas. The detailed steps and considerations outlined in this guide give you the knowledge and confidence to embark on a successful solar tube installation. Embrace the beauty and benefits of natural light, and enjoy a well-lit, energy-efficient, and uplifting environment in your home or workspace.
About the Author
Solar Panels Network USA stands at the forefront of solar energy solutions, driven by a team of seasoned solar engineers and energy consultants. With over decades of experience in delivering high-quality solar installations and maintenance, we are committed to promoting sustainable energy through customer-centric, tailored solutions. Our articles reflect this commitment, crafted collaboratively by experts to provide accurate, up-to-date insights into solar technology, ensuring our readers are well-informed and empowered in their solar energy decisions.

