Portable solar panel systems offer flexibility and convenience for camping, emergency backup, and temporary power needs. Unlike fixed rooftop installations, portable systems can be positioned to track the sun, deployed quickly at various locations, and stored when not in use. Modern portable solar kits include foldable panels with integrated batteries, charge controllers, and inverters—making clean, renewable energy accessible for outdoor adventures, natural disaster recovery, and off-grid remote work.
Whether you’re an outdoor enthusiast seeking power for camping trips or a homeowner building emergency backup capacity, portable solar systems provide cost-effective energy solutions without permanent installation. This comprehensive guide covers system types, setup procedures, optimization strategies, and real-world performance to help you select and deploy portable solar effectively.
Contents
- 1 Understanding Portable Solar System Types
- 2 Key Components in Portable Solar Systems
- 3 Sizing Portable Solar Systems for Your Needs
- 4 Setting Up Portable Solar Systems
- 5 Positioning and Optimization
- 6 Real-World Performance Expectations
- 7 Maintenance and Care
- 8 Frequently Asked Questions
- 8.1 How much does a portable solar system cost?
- 8.2 How long does it take to set up a portable solar system?
- 8.3 Can portable solar panels power my entire home?
- 8.4 How much weight should I expect for a portable solar system?
- 8.5 Will my portable solar system work on cloudy days?
- 8.6 How often should I clean portable solar panels?
- 9 Summing Up
Understanding Portable Solar System Types
Portable Solar Panel Kits (Panels Only): Foldable panels (100–400W) paired with portable charge controller and battery (sold separately or bundled). Advantages: modular, can add/upgrade components independently, scales easily. Disadvantages: multiple components require manual setup, integration can be complex. Cost: $300–$1500 for panels alone.
All-In-One Portable Power Stations: Integrated systems combining battery, charge controller, inverter, and AC outlets in single rugged enclosure. Panels attach via cable for flexible positioning. Ready-to-use out of box; no component integration needed. Disadvantages: less modular, harder to upgrade components individually. Examples: Jackery, Goal Zero, EcoFlow. Cost: $800–$4000 for complete systems.
Expandable Solar Generator Systems: Modular power stations with separate panel modules that scale with your needs. Add more panels as energy consumption grows. Examples: EcoFlow Delta Pro, Tesla Powerwall (limited portable use). Cost: $1500–$5000+ depending on capacity and panel count.
DIY Portable Kits: Buy individual components (flexible panel, portable battery, PWM controller, 12V inverter) and assemble custom system. Advantage: lowest cost, maximum customization. Disadvantage: requires troubleshooting knowledge and assembly skill. Cost: $200–$800 for complete DIY system.
Key Components in Portable Solar Systems
Portable Solar Panels:
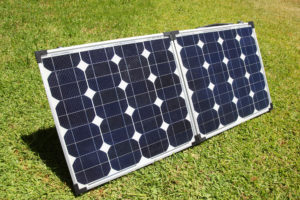
Foldable monocrystalline panels (100–400W) dominate portable market. Design: panels hinged together, fold like briefcase for transport, unfold for deployment. Weight: typically 0.5–1.0 lbs per 10W (example: 100W = 5–10 lbs). Efficiency: 18–22% (comparable to fixed rooftop panels). Cost: $1.00–$2.00 per watt ($100–$800 for 100–400W).
Flexible thin-film panels (50–100W) lighter and more rugged than rigid panels, mounting to fabric or curved surfaces. Efficiency: 13–15% (lower than rigid), cost: $1.50–$2.50 per watt. Better for emergency kits and ultralight camping; less efficient than rigid panels.
Portable Lithium Batteries: LiFePO4 batteries standard in modern portable kits. Capacity range: 500 Wh (Watt-hours) to 5+ kWh. Weight: roughly 2–3 lbs per kWh. Typical portable system: 1000–3000 Wh (1–3 kWh) for weekend camping, 5000+ Wh for extended trips or home backup.
Advantage over lead-acid: lightweight (essential for portable use), safe chemistry, long cycle life (3000–5000 cycles = 10+ years), no maintenance. Cost: $1.00–$2.00 per Wh ($1000–$3000 for 1–3 kWh).
Portable Charge Controllers: Solar charge controllers manage panel output to batteries. Portable systems typically use MPPT (maximum power point tracking) controllers, which optimize power transfer from panels at varying sun angles and light conditions. Controller rating: typically 30–100A depending on panel wattage. Built-in MPPT controllers in all-in-one systems simplify setup. Standalone controllers (for DIY systems) cost $100–$400.
Portable Inverters: Convert DC battery power to AC household power (120V) for standard appliances. Capacity range: 500W–3000W. Pure sine wave inverters (required for sensitive electronics): $300–$1500. Most portable power stations include 1500–2000W pure sine wave inverters.
Charge Inputs (AC/Solar/Car): Modern portable systems support multiple charging sources: solar panels (DC input), AC wall outlet (when available), and 12V car charger. This flexibility allows recharging from grid if solar generation insufficient, ensuring reliable backup power even in low-sun conditions.
Sizing Portable Solar Systems for Your Needs
Define Your Use Case: Weekend camping, extended off-grid travel, home backup power, RV supplementation, or emergency preparedness determines appropriate size.

Weekend Camping (2–3 days): Typical consumption: 0.5–1.5 kWh (LED lights, phone/laptop charging, portable speakers). System recommendation: 200–300W panels + 1000–1500 Wh battery. Cost: $600–$1500. Examples: Jackery 1500, Goal Zero Yeti 1400.
Extended Off-Grid Travel (5–7 days): Consumption: 2–4 kWh (camping fridges, cooking, sustained device charging). System: 400–600W panels + 3000–5000 Wh battery. Cost: $2000–$4000. Examples: EcoFlow Delta 2 with 200W solar panels, Goal Zero Yeti 6000X.
Home Backup Power (24–48 hour outages): Consumption: 10–20 kWh depending on home size and appliances powered. System: 1500W+ panels + 10–15 kWh battery. Cost: $5000–$15000+. Examples: Tesla Powerwall + Generac solar, EcoFlow Delta Pro with multiple batteries.
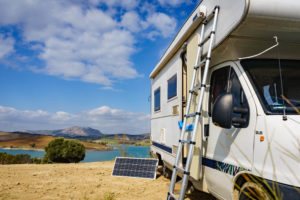
RV Supplementation: Offsets rooftop solar in winter/cloudy conditions. Consumption: 2–4 kWh daily. System: 400W panels + 2000–3000 Wh portable battery. Cost: $1500–$3000. Advantage: portable solar “topped up” battery during day, freeing rooftop panels for night generation storage.
Setting Up Portable Solar Systems
Basic Setup (All-In-One Power Station):
1. Unpack power station and inspect for damage. Check battery charge level; most ship partially charged (30–50%).
2. Deploy solar panels nearby, positioning to face sun. Ideal: south-facing (Northern Hemisphere), with panels tilted at sun angle (roughly equal to latitude, adjusted seasonally). If tilting not available, lay panels flat to sun’s angle.
3. Connect panels to power station using supplied cables and connectors. Most systems use MC4 connectors or proprietary connectors—ensure correct polarity (positive red, negative black).
4. Power station automatically detects solar input and begins charging. Monitor charge rate via display or app. Typical charge rates: 500–1500W depending on panel wattage and sun conditions.
5. Connect loads (appliances, devices) to AC outlets, USB outputs, or 12V ports as needed. Most power stations support 3–5 simultaneous loads.
Advanced Setup (Modular DIY System):
1. Connect portable battery to charge controller DC input using appropriately sized cables (typically 2/0 or 4/0 gauge for systems over 100A).
2. Connect solar panels to charge controller DC input, respecting polarity (red positive, black negative). Most DIY controllers accept 12V–48V input; match panel voltage to controller specs.
3. Connect loads to battery via separate DC/AC inverter. For AC devices: battery → inverter → appliances. For 12V DC devices (lights, car chargers): battery → 12V breaker/fuse → load.
4. Set charge controller parameters: battery type (LiFePO4, lead-acid), nominal voltage, charging current limits. Consult controller manual for proper settings.
5. Monitor via controller display or smartphone app (if available). Adjust parameters and troubleshoot as needed.
Positioning and Optimization
Solar Panel Orientation: Optimal angle depends on latitude and time of year. Summer: tilt panels lower (5–10° from horizontal). Winter: tilt steeper (40–50° from horizontal). Spring/fall: ~25–35° is compromise. Most portable systems include kickstand or mounting bracket allowing angle adjustment.
Tracking the Sun: Manually reposition panels 2–3 times daily (morning, noon, afternoon) increases output by 20–40% compared to fixed orientation. This effort is worthwhile during camping or extended off-grid use.
Avoiding Shading: Even partial shade from trees, buildings, or tent reduces panel output dramatically. Position panels in open, unshaded area. If complete shade unavoidable, panels still generate power (20–50% of peak output depending on shade density).
Temperature Management: Panels operate more efficiently in cool conditions. If panels get hot (100°F+), efficiency drops by ~0.5% per degree Celsius above 25°C. Ensure airflow beneath panels; avoid placing on hot surfaces. Battery also has temperature limits; avoid charging in extreme cold (<32°F) or heat (>104°F) to prevent degradation.
Keeping Panels Clean: Dust and dirt reduce output by 5–20%. Wipe panels with soft cloth and clean water periodically, especially after dusty or sandy camping.
Real-World Performance Expectations
Clear Day Performance: At 1000 W/m² irradiance (peak sun), 100W panel generates ~100W (minus controller/wiring losses ~5–10%). Over 8 hours of useful sunlight: 100W × 8 hours × 0.9 efficiency = 720 Wh daily generation.
Partly Cloudy Day: Output 40–70% of clear day. Same 100W panel: 720 Wh × 0.5 = 360 Wh daily generation.
Overcast Day: Output 15–25% of clear day. Same 100W panel: 720 Wh × 0.2 = 144 Wh daily generation.
Example Weekly Trip: 300W portable system + 2000 Wh battery, typical American location, mixed weather:
Day 1 (Clear): 300W × 8 hours × 0.9 = 2160 Wh generated, consumption 500 Wh (LED camping, phone charging). Net: +1660 Wh battery charge.
Day 2 (Partly Cloudy): 300W × 8 hours × 0.5 × 0.9 = 1080 Wh, consumption 500 Wh. Net: +580 Wh.
Day 3 (Overcast): 300W × 8 hours × 0.2 × 0.9 = 432 Wh, consumption 800 Wh. Net: -368 Wh.
Result: Battery still provides power even on overcast day. Total output: ~3670 Wh over 3 days covers ~1800 Wh consumption comfortably. System provides reliable power across weather variations.
Maintenance and Care
Panel Maintenance: Clean panels monthly or when visibly soiled. Use soft microfiber cloth and distilled water; avoid abrasive cleaners. Check wiring connectors for corrosion; apply dielectric grease if oxidized.
Battery Maintenance: Lithium batteries require minimal maintenance. Avoid overcharging (most systems auto-stop at 100%), deep discharging (charge when 20% or lower), and extreme temperatures. Store in cool location when not in use.
Controller and Inverter: Ensure ventilation around charge controller and inverter to prevent overheating. Check for any burning smells or visible damage during use.
Storage: Store complete system in cool, dry location when not in use. Charge battery to 30–50% before extended storage (improves battery longevity). Check battery charge monthly during long-term storage and top up if needed.
Frequently Asked Questions
How much does a portable solar system cost?
Portable solar kits range from $300 (100W panels + battery) to $15000+ (large multi-kWh systems). Typical weekend camping setup (200–300W panels + 1–2 kWh battery): $800–$2000. All-in-one power stations: $1000–$4000 depending on battery capacity and wattage.
How long does it take to set up a portable solar system?
All-in-one power stations: 10–15 minutes (unpack, position panels, connect cables). DIY modular systems: 30–60 minutes for first-time setup (component assembly, parameter configuration). Subsequent setups are much faster as you gain familiarity.
Can portable solar panels power my entire home?
Larger portable systems (3–5 kWh battery + 1500W+ panels) can power essential loads (refrigerator, lights, charging) for 24–48 hours. Full home power indefinitely requires stationary systems with 10+ kWh battery capacity. Portable systems excel for backup power, camping, and supplemental use.
How much weight should I expect for a portable solar system?
Typical portable system weights: 100W foldable panels (5–10 lbs), 1–2 kWh battery (30–50 lbs), charge controller/inverter (5–10 lbs). Total: 40–70 lbs for complete camping system. Ultralight camping systems (50W + 500 Wh): 15–25 lbs. Heavy-duty home backup (5+ kWh): 200+ lbs (requiring wheels/dolly).
Will my portable solar system work on cloudy days?
Yes, output is reduced to 20–50% of clear-day capacity depending on cloud density. A 300W panel on overcast day generates ~60–150W. Battery capacity allows continued power even on multiple cloudy days if sized for 3–5 days autonomy.
How often should I clean portable solar panels?
Clean monthly or when visibly soiled. Dust, pollen, and debris reduce output by 5–20%. Use soft cloth with distilled water; avoid abrasive cleaners or scouring. More frequent cleaning (weekly) worthwhile if camping in dusty environments.
Summing Up
Portable solar systems deliver flexible, reliable renewable energy for camping, emergency backup, RV supplementation, and off-grid adventures. Modern all-in-one power stations simplify setup—most are ready to use within minutes of unboxing. For those needing larger capacity or customization, modular DIY systems offer cost advantages and flexibility at the expense of assembly complexity.
Real-world performance varies with location, season, and weather; most portable systems are sized to handle cloudy conditions through battery capacity. Whether you’re seeking weekend camping freedom, home backup power for outages, or emergency preparedness, portable solar offers accessible renewable energy solutions without permanent installation.
Ready to explore portable solar options for your adventure or backup power needs? Call (855) 427-0058 to discuss portable system sizing and options, or get a free portable solar consultation today.
Updated