The decision to install solar panels is, beyond doubt, very beneficial. It not only reduces your carbon footprint but also helps you save on electricity bills.
Solar panel installation got you looking for a guide. But that’s alright. It is not the most straightforward of jobs. From checking the installation location to choosing the type of solar panel, you need to consider multiple factors. Besides, the solar installation process itself has seven essential steps.
While you may not need a professional to set up the panels, you need to have the complete setup information.
Contents
- 1 Key Takeaways
- 2 What Is a Solar Panel?
- 3 What Are the Different Types of Solar Panels?
- 4 Specifications for Different Types of Solar Panels
- 5 What Factors Need to Be Considered Before Solar Panel Installation?
- 6 Solar Panel Installation Process: A Step-by-Step Guide
- 7 Avoid These Solar Panel Installation Mistakes
- 8 Case Study: Streamlining Solar Panel Installation for Optimal Performance
- 9 Experience Solar Excellence with Us!
- 10 Summing Up
Key Takeaways
- Solar panel installation offers environmental and financial benefits, reducing carbon footprint and electricity bills.
- Types of solar panels include monocrystalline (efficient but expensive), polycrystalline (cost-effective but less efficient), PERC (highly efficient), and thin-film (flexible but less efficient).
- Before installing solar panels, assess roof condition, slope, weight-bearing capacity, power consumption, panel type, mounts, warranty, and installation costs, and follow a careful step-by-step installation process to ensure optimal performance.
What Is a Solar Panel?
It is a frame or sheet of multiple solar cells aligned together to convert sunlight into electricity. A panel may have 60, 72, or 90 solar cells.
Each solar cell comprises phosphorus, boron, and silicon. While the first two provide the negative and positive charges, silicon acts as a semiconductor.
As the sun rays strike the panel, a photovoltaic reaction takes place, generating electricity. Thus, solar panels are also known as photovoltaic or PV panels.
What Are the Different Types of Solar Panels?
Solar panels are of various types based on their composition and materials. As a result, these differ in costs, efficiency, and power capacity. Check out the four main types of solar panels.
Monocrystalline Solar Panels
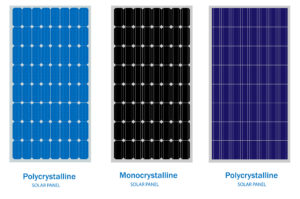
As it is pretty evident from the name, monocrystalline panels are made from a single crystal. It is a pure silicon crystal that is cut into multiple wafers. You will quickly identify a monocrystalline solar panel from its black color.
These are among the most efficient panels of the lot, with an efficiency rating of 20%. They consume relatively less space and are highly durable. Besides this, monocrystalline panels can provide the maximum power even if it’s small, i.e., up to 300w of energy.
Despite their multiple benefits, monocrystalline solar panels are the most expensive ones. It is so primarily due to their inefficient manufacturing as single crystal production leads to a significant amount of silicon waste.

Polycrystalline Solar Panels
Contrary to single-crystal solar panels, these are made from multiple silicon crystals. Each of the fragments is melted and converted into square-shaped blocks. As a result, these panels are relatively cheaper as there is zero to minimal to zero wastage of silicon.
That said, this very quality also makes the solar panel comparatively less efficient. The quality is comparatively lower. They convert less energy per cell, and as a result, occupy more space. These panels have an efficiency rating of 15-17%.
Polycrystalline solar panels provide around 240-300w of energy per cell.
Choosing the right type of solar panel is crucial. Monocrystalline panels are efficient and space-saving, but polycrystalline panels offer a cost-effective solution without significant efficiency loss. It all depends on your specific needs and budget.
Senior Solar Panel Installer
Passivated Emitter and Rear Cell (PERC) Solar Panels
These are the advanced versions of monocrystalline solar panels as they comprise an additional passivation layer. Thus, they produce a greater amount of energy per cell. Moreover, this is possible with a relatively small footprint.
As a result, PERC Solar Panels have the highest efficiency rating of up to 25%. Though they are more expensive to produce than the conventional monocrystalline and polycrystalline panels, their energy output is cheaper.
Thin-Film Solar Panels
With their construction reflecting their name, thin-film solar panels are the thinnest of the lot. You can easily bend them as they are flexible enough, making them light and easy to install. Additionally, they come in different sizes to meet your needs and do not have a fixed number of cells.
Thin-film solar panels are of three types, all of which are relatively less efficient than silicon panels.
- Copper indium gallium selenide (CIGS): Most efficient thin-film solar panels.
- Amorphous silicon (a-Si): Less efficiency but also low-cost production.
- Cadmium telluride (CdTe): High efficiency, but it is not recyclable.
Specifications for Different Types of Solar Panels
| Solar Panel Type | Efficiency Rating | Power Capacity (per solar cell) | Average Cost (per watt) |
|---|---|---|---|
| Monocrystalline | 20% | 300 watts | $1-$1.50 |
| Polycrystalline | 15-17% | 240-300 watts | $0.70-$1 |
| PERC | 25% | Over 400 watts | $0.32-$0.65 |
| CIGS (Thin-Film) | 13-15% | Less than 240 watts | $0.60–$0.70 |
| CdTe (Thin-Film) | 9-11% | Less than 240 watts | $0.50–$0.60 |
| A-Si (Thin-Film) | 6-8% | Less than 240 watts | $0.43–$0.50 |
What Factors Need to Be Considered Before Solar Panel Installation?
Even the best quality solar panel may not last long enough if your roof is old or weak. Moreover, you need to consider its exact location and direction to ensure proper water drainage and maximum sunlight. Check out all the factors to weigh upon before installing solar panels.
Roof Condition
If your roof is not in good condition, it may not be eligible for mounting a solar panel system. It needs to be solid and free of damage.
Otherwise, the solar panel will not last its complete life of around 20-25 years. Besides, make sure your roof does not fall in a shady area, as the panel must get maximum sunlight.
Roof Slope
The slope of the roof has a significant impact on the efficiency of the solar panel and the drainage system. Your panels will produce maximum electricity if you install them on a roof facing the North.
Besides, if you incline it between the range of 10-30°, it will ensure proper outlet of rainwater and debris.

Maximum Weight the Roof Can Withstand
All kinds of roofs have a specific limit for the maximum weight that they can withstand. Since a batch of solar panels will surely be heavy, you must check the maximum weight-bearing capacity of your roof.
Get it checked by professionals, and they will suggest additional support if needed.
Power Consumption
Different households require varying amounts of power according to their size and usage habits. Before picking solar panels, make sure to calculate how much power you will require.
Calculate the number of hours you will use each appliance for in a day. Purchasing the correct size of the solar panel system will ensure its prolonged use and prevent overheating damage.
Type of Solar Panel
The type of solar panel depends upon factors like your budget, space, and power consumption requirements. Polycrystalline and monocrystalline are the most common options, providing a maximum power of 240-300 watts.
However, PERC is the most efficient, while thin-film solar panels are the cheapest.
Type of Panel Mounts
There are three basic types of panel mounts – pole, roof-ground, and flush mount. Your choice of the panel mounts will depend on the condition and the available space on your roof.
Warranty
Solar panels usually come with a warranty of up to 25 years. The full warranty and assurance for flawless functioning may vary between different brands.
However, always ask for warranty certificates for both solar panel systems and installation and use them as needed.
Price of Installation
Before picking the solar system, you need to calculate the entire cost of purchasing and installation.
Even if you wish to install a large system, remember that it will help save money on electricity bills in the long run. Besides, you can even check for subsidies provided by the government to use renewable sources of energy.
Proper roof assessment is a key step before installation. Ensuring your roof can handle the weight and is positioned correctly for maximum sunlight exposure will optimize the efficiency of your solar panels.
Lead Solar Engineer
Solar Panel Installation Process: A Step-by-Step Guide
Once you have considered all the factors and chosen the right solar panel, make sure to follow all the steps. If you miss out on even one of the steps or do not install carefully, you may end up ruining the entire system.
Step 1: Installing the Mounts
According to the chosen mounts, fix them on the roof cautiously. Since these will be holding the expensive panels, you want to spend enough time on their positioning.
Bear in mind the direction you want the panels to be facing, i.e., the direction with maximum sunlight.
For maximum exposure to the sun, make sure to position the panel in a slightly tilted position. The angle can be anywhere between 18-36 degrees.
Tip: Countries present in the Northern Hemisphere will get maximum sunlight from the Southern direction. On the other hand, the Southern Hemispherical countries get the maximum sunlight from the North.
Step 2: Installing the Panels
Once the mounts are in place, it is time to affix the solar panels. Give enough time to tighten the nuts and bolts so that you do not face any trouble at a later stage.
The panels are mounted in the open and exposed to rain, wind, and other harsh conditions. Thus, securing the entire structure is of the utmost importance.
Another essential factor is using only the top brand fasteners to ensure maximum safety.
Step 3: Electrical Wiring
After setting the solar panels, you need to set up the electrical wiring. Most professionals recommend using universal connectors such as the MC4, as you can connect these to all types of panels.
Based on the sequence of connections, you can follow the series or parallel connection. The former is done to increase the total voltage and meet the minimum requirements of the operation. Whereas parallel connection helps boost the amperage.
- Series connection: In this type of connection, the positive wire of one solar panel is connected to the negative side of another panel.
- Parallel connection: For this connection, one panel’s positive wire is connected to the other panel’s positive side, and the same applies to the negative sides.
Step 4: Connecting to Solar Inverter, Battery, and Grid
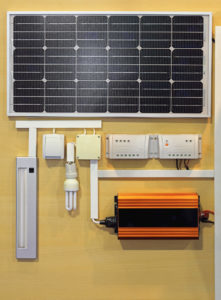
Once the system is set up, the next step involves connecting it to the solar inverter. For this, you need to follow a parallel connection. Connect the solar panel’s positive wire to the inverter’s positive terminal. The same applies to the negative terminal.
After connecting it to the inverter, you need to connect the system to the battery and the grid.
Connect the inverter to the battery following the parallel connection rule. That is, connect the battery’s positive terminal to the inverter’s positive terminal. Do the same with the negative terminals. You need to do this for storing electricity backup in the inverter.
Once the entire setup is ready, all you need to do is connect it to the grid, i.e., the main power system. For this, you will need a normal plug to connect to the house’s main electric switchboard.

Step 5: Turning On the Solar Inverter
Now that you are done with setting up, switch on the inverter and the main switch of the house.
Voila!
The inverter will supply energy to the home and also display the electricity consumption statistics. You can now enjoy renewable energy for all the years to come!
Don’t overlook the importance of using high-quality mounts and secure fasteners. This not only ensures the longevity of your solar installation but also maximizes safety and performance under various weather conditions.
Chief Installation Officer
Avoid These Solar Panel Installation Mistakes
Despite clear instructions, making a few mistakes during the setup is inevitable. However, you can still avoid them if you are aware of them beforehand. Moreover, you will enjoy the benefits of a solar panel system only if you install it correctly.
Solar Panel Mount Material
Problem: Have you chosen an iron stand for the solar panel mount? Due to its exposure to rain, heat, and other elements, it is likely to become rusty within a short while. Eventually, it will not be strong enough to hold the solar panels in place.
Solution: Use GIA stands to mount the solar panels on as these are sturdy and highly durable.
Earthing Stands
Problem: Apart from using strong stands, you need to set up a proper earthing system. In the absence of earthing, the solar panel system can get damaged pretty quickly. Besides, it leaves room for overload risks.
Solution: Allocate three earthing stands for your entire solar panel system. It prevents natural mishaps and saves your power supply from overloading. Additionally, it stabilizes the voltage to protect your electronic devices further.
Case Study: Streamlining Solar Panel Installation for Optimal Performance
Background
At Solar Panels Network USA, we pride ourselves on delivering high-quality solar solutions tailored to meet our clients’ unique needs. This case study illustrates our approach to installing a solar panel system that maximizes efficiency and longevity for a residential client.
Project Overview
Our client, a homeowner looking to reduce energy costs and minimize their carbon footprint, engaged us to install a solar panel system on their property. The project aimed to leverage the benefits of solar technology while ensuring a seamless and efficient installation process.
Implementation
Site Assessment and Preparation
We began with a comprehensive site assessment, considering the roof’s condition, slope, and maximum weight-bearing capacity. These factors are crucial for ensuring that the roof can support the solar panels without compromising structural integrity.
Selection of Solar Panels
Based on the client’s energy needs and budget, we recommended monocrystalline solar panels due to their high efficiency and durability. These panels provide the best balance of performance and cost-effectiveness for residential installations.
Installation Process
- Mount Installation We used high-quality GIA stands for mounting the panels, ensuring they were robust and resistant to environmental factors like rain and wind. The mounts were positioned to maximize sunlight exposure, with an optimal tilt angle for the region.
- Panel Installation The solar panels were securely attached to the mounts using top-grade fasteners. This step is critical for the stability and safety of the system, especially in areas prone to severe weather conditions.
- Electrical Wiring Universal connectors, specifically MC4 connectors, were used to facilitate easy and reliable wiring of the panels. We implemented a series connection to increase voltage and meet the system’s operational requirements.
- Connecting to Inverter and Grid The system was connected to a high-efficiency solar inverter, which was then linked to a battery storage unit for backup power. Finally, the setup was connected to the main power grid, enabling the client to benefit from net metering.
- System Activation Once all components were installed and connected, we activated the system and performed thorough testing to ensure optimal performance. The client received a detailed tutorial on system operation and maintenance.
Results
The installation was completed efficiently, and the system began generating power immediately. The homeowner reported a significant reduction in electricity bills, with an estimated annual savings of 25%. Additionally, the high-efficiency system ensured consistent energy production, even during less sunny periods.
The use of durable materials and secure installation practices resulted in a robust and reliable solar power system, poised to deliver long-term benefits.
Summary
This case study showcases our expertise in delivering tailored solar solutions that enhance energy efficiency and reduce costs. By carefully assessing site conditions and selecting the appropriate equipment, we ensured a seamless installation process. Our commitment to quality and customer satisfaction drives our efforts in providing sustainable energy solutions that meet our clients’ needs.
Experience Solar Excellence with Us!
Trust in Solar Panels Network USA, where our seasoned experts deliver top-quality solar solutions for homes and businesses nationwide. With a legacy of countless successful installations and a commitment to sustainable energy, we’re your reliable partner in the solar journey. Ready for a brighter, eco-friendly future? Call us now at (855) 427-0058 and harness the power of the sun!
Summing Up
The journey to solar panel installation is both an environmentally conscious and financially savvy choice. It encompasses carefully considering various factors such as the type of solar panels, the condition and specifications of your roof, and a meticulous installation process. You can ensure an effective solar setup by understanding the different solar panel options, such as monocrystalline, PERC, and thin-film, and assessing your specific energy needs and roof conditions. Additionally, following a step-by-step guide for installation and being aware of common mistakes can lead to a successful and sustainable solar energy solution for your home or business. Embracing solar power is not just about technology adoption; it’s a commitment to a sustainable and cost-effective future.
About the Author
Solar Panels Network USA stands at the forefront of solar energy solutions, driven by a team of seasoned solar engineers and energy consultants. With over decades of experience in delivering high-quality solar installations and maintenance, we are committed to promoting sustainable energy through customer-centric, tailored solutions. Our articles reflect this commitment, crafted collaboratively by experts to provide accurate, up-to-date insights into solar technology, ensuring our readers are well-informed and empowered in their solar energy decisions.

